Theme 1 Macro , A final image choice , From a idea to the final presented image
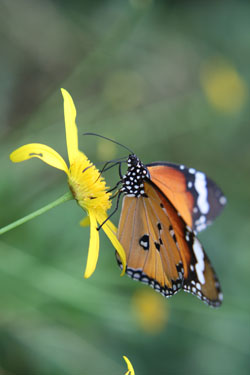
SITTING PRETTY (Monarch Butterfly)
Macro final 10 image captured and presentation
Theme 1 MACRO
Date 10th of November 2010
Time 13.46
Lens 60mm
Shutter speed 1/80 sec
Aperture f/4.5
ISO 200
Metering Evaluative
No flash
Location
Stratford upon Avon butterfly park
Swan's Nest Lane,
Stratford-upon-Avon,
Warwickshire
A walk around Stratford upon Avon butterfly park
I went to Stratford butterfly park and took some macro shots of the many butterflies bugs in there
Ambient light
It was sunny day outside. The butterflies are housed in a big greenhouse so the ambient light was quite good
Planing
I took plenty of water because of the humid heat inside i got there in morning so there would be less general public , I hoped to capture a macro shot of a butterfly on a flower feeding , I was hoping to use a depth of Field and have a strong focal point using the rule of thirds aslo .
Equipment
I took my 450d camera I took 2 lenses my 50mm lens and my 60mm macro lens
I also took some magnification filters for both my lenses
I took a flash gun to help with exposure
Equipment for shot
I used my canon 450d camera
Lens Tamron 60mm lens
Equipment operation
I used my 60 mm lens with Manuel focusing and Manuel settings I set the aperture to f/4.5 to show some depth of Field and I used a shutter speed of 1/80 any slower and I might of had camera shake with such a close up image and i used a ISO of 200 to help with the Exposure . I got close up quietly so not to scare the butterfly off and moved up close and metered onto the butterfly's head .
Risk and Health and safety
I was careful not to use a tripod in case of the public tripping on it and falling
I took plenty of water because of the humidity
I was careful of the butterflies on the floor there was one or two dead butterfly's that had been stepped on by the unaware public
Image
A Monarch Butterfly feeding on a yellow flower
Composition and choice of image
I took a few different compositions of this butterfly
Under exposed
Out of focus
Slightly over exposed and a standard composition
Conclusion
I picked this image because of the rule of thirds and the tonal range and depth of Field
and detail and sharpness of the butterfly and flower .
ORIGINAL IMAGE
ORIGINAL IMAGE
Editing
I took the original image into photoshop and made a slight crop and slightly sharped the image .
Monarch Butterfly
The original image was cropped to improve the photo cropped to 300 dpi
Using the crop tool you can select the best area of a photo
Frame
After i had finished I put a simple black and white border to enhance the image and bring out the colours and detail and tones of the butterfly
You can enhance your digital image by putting a frame round in it in photo shop or other photo editing software
A simple video showing how to putt a border on your image
I have chose 4 simple borders to try on my image to see which one will look best on my digital blog
my original image with out a border
The first border is a simple black border with a thin inner white border
to do this you open your image up in photoshop
First to make sure your inner border is white press d
Then you make your image smaller to make it easy to work something like 10 " on the longest side
To make the thin white inner border you you go to image and canvas size and putt in a small size i tyred 00.7 inch's to show a very thin white border so press OK and you will See a very slim white border around your image
Now to make the larger black border you need to change the background colour back to black so press x
Then you go to canvas size and putt in how big you want your bigger outer border i putt in 2 incs then press OK and there you have simple black border with a inner white border
You can see the inner white border and the larger black border
Experiment with different sizes of borders in till you think the photo is shown to its best
The final image with black inner white border
Another border you can try is a round border
First of all make sure your image is a workable size and choose a colour for your border
Then go to canvas size and putt in your border size like before
Now you go down to the round rectangle tool on the left and choose a radious size for your rounded border
Then you go to the top and pick the path option in the middle of the 3 squares and pick a radius for your rounded border i used a size of 25 pixels
Then all you do is drag the cursor from the left of the image to the right and and you go to select and press inverse and then make sure your foreground colour is the right colour and go to edit and fill and you should have your rounded border
Final image with black rounded border
Now I'm gonna try the image with a drop shadow effect
First i duplicated my layer and i used white as my background colour
and done the same as above by going to canvas size and making a white border
i then i went to layer and choose layer style and i went to drop shadow and worked on the
The levels in till i got the best result
Final image with a drop shadow
I also tyred a simple brown border
Final brown border
I also watched this video on borders
And came up with this border
So there are many different options on putting a border on your particular image sometimes just a simple border will work best or depends on the image .
There are many ways to present a photographic image from presenting it digitally on a blog or putting the digital image in a digital photo frame or by having your image printed onto many forms of paper or canvas
or even having it on a t shirt or a mug
Today photo's are mostly displayed on electronic devices from cell phones to digital picture frames
The trouble is, with digital images there are technical factors related to the electronic display gizmo that can
have a effect on how good an image looks.
A DIGITAL PHOTO FRAME
The average photography consumer doesn't have a calibrated computer So if they want to display their photographic work in a consistent way, they make a print of the image.
Prints fall into 2 broad categories by size - desktop prints and wall prints.
Desktop prints are generally considered to be 8" x 10" and 5" x 7" Obviously, anything larger falls into the wall print category.
Printing at home
One of the easiest ways to print your images is to print them on your home printer
Most printers can print up to A4 size so you can get quite a big photo
The quality of the image will depend on your printer and the quality of paper you use but you can get some surprising results from a standard printer.
Printer
Home photo paper
A short video about printing at home
Printing online
Printing your images online can be a cheaper option if you have many photos it can be as cheap as 5p a photo
Online you can have your photos printed from 6" x 4" to poster sizes like 45" x 30"
You can also have many other options for you photos online here are some exsamples
Get your favourite photo printed onto a Teddy's t shirt
Have that special photo with you every time you have a cup of tea
Have your photo made into a jigsaw for your family to play with for many years to come
Gt your favourite photo made up as stickers to share with your friends
Get your image on a set of coasters
See your image on a pillow
Get your favorite photos made up in to a calendar or diary
Get your image on a magnet or keyring
Have that special holiday or romance captured in a book
Have your photo made into a birthday card or a card for a special occasion
Presenting your print
The next consideration is how to present the print. There are presentation methods like gallery wraps and standouts, but framing is still the most common way to display a print.
The purpose of using a frame is to set the image off from the wall or desktop environment, and highlight it without detracting from the image
you can have it putt onto canvas or in a frame
then just hang it on your wall
There are so many options you can choose the colour of your frame to suit your photo
also you can have your print wrapped and putt on canvas with many different looks to go for.
When Framing a print you would try to select one or two colors in the image and then select complimentary mat and frame colors to help cause them to pop or to emphasize the colors in the image.
Frame shape and style can also be used to highlight elements in the image.
Professional printing
Joe Cornish having one of hes prints printed and framed
Photography by renowned landscape photographer Joe Cornish
Printed on a Lightjet 5000, mounted, laminated and framed
Lightjet 5000
The lightjet 5000 produces true continuous tone photographs with out visible dots
InkJjet and electrostatic printers cannot compete with the same crispness of image and detail
It can print a 4 foot x 8 foot image on a single sheet so was perfect for a Joe Cornish landscape
Blogs
Presenting using a blog is a cheap way of presenting your images also you can see them from any where there is Internet form all round the world
Advantages
Cost free to set up a blog
Easy to up load your photos
A fast way to show your images
Can be seen any where in the world where there is Internet
Disadvantages
Image can only be as good as the screen its being show on
Have to show a smaller image than original because of worry of copyright
People can steal your images
Presented folder
Presenting your images in a folder is something Ive done before its a nice way to have something you can hold in your hands and show people your images in full print .
Advantages
Can be shown without Internet
Your copyright is safe
You can use it to show your work
Can show the full quality image
Disadvantages
Can be damaged in transit
The cost of folder and the cost of print
Can be hard to travel with because of the size
Exhibitions
Their are many photography exhibitions all over the world and the images are presented
in all different ways
A Japanese exhibition
This exhibition shows many frame less photos either side of a long white wall it looks impressive
Making peace exhibition 2010
A outside exhibition
I like how the images are so big and spaced out so every can see each image clearly and read information about the photo looks like a inspirational exhibition
Making peace is a photographic exhibition produced by the International Peace Bureau, Geneva to mark their Nobel Peace Prize centenary. It was curated by Ashley Woods, formerly with Magnum Photos
A macro exhibition
This macro exhibition in a library has the images all with black borders this helps the image stand out
Martin parr exhibtion
Martinn parr
Martin Parr talking about hes exhibition at gateshead at the baltic
I went to the martin parr exhibition at the Public in west brom to see Martin Parr's exhibition on black country stories with over 600 photos on view off the black country life , it had two ways of showing hes work down stairs there was a large white wall with hundreds of images all together with enough room for a white border to form for each photo
A white wall with hundreds of photos stack up in lines
Upstairs he had a small galley of hes larger prints some walls had 3 prints some had up to 6 all carefully putt together to show off hes work to its best
Add caption
The exhibition had maybe 25 photos or more shown with good lighting and good presentation.
To present a image in it self is art to capture the best of the photo and to display it to a wider audience is something i hope to learn to improve my photos .
Conclusion
I will use the digital method of presentation for my 211 Assignment because of the ease of use and cost
I will present my final 10 images framed useing photoshop I belive there are no Hazards to this method
and i have legal copyright of my photos , I dont belive there are any
ethical considerations with my focus on nature macro work